 EN
EN


Creating a Mini Balcony Garden: A Complete Practical Guide to Combining Potting Mix with Pebble Surfacing
Creating a neat, refined mini-potted garden on a small balcony requires more than just buying plants and pots. This article presents a real-life balcony makeover case study featuring a combination of scientifically formulated potting mix and a pebble top-dressing layer. This approach solves common issues—such as soil splashing, surface compaction, pest infestations (like fungus gnats), and rampant weed growth—offering a practical solution that even gardening beginners can easily implement.
With limited space in urban apartments, mini-balcony gardens have become a popular choice for home gardening enthusiasts. However, many gardeners struggle with problems like soil splashing onto surfaces during watering, rapid soil compaction, weed overgrowth, and frequent outbreaks of fungus gnats. Often, people focus solely on selecting attractive plant varieties while neglecting the potting medium and surface treatment; the result is a cluttered, messy look, alongside plants that suffer from poor root health—such as suffocation or rot—and stunted growth.
This article shares a comprehensive balcony makeover project that combines a scientifically balanced potting mix with a pebble top-dressing layer. This method balances plant root health with aesthetic appeal, allowing you to create a tidy, sophisticated mini-balcony garden on a modest budget—a solution suitable for both enclosed and open balconies.
Case project overview
Renovated balcony: a closed balcony of a small urban apartment, with a practical area of 3.4 square meters, 4 to 6 hours of sunlight per day, and medium ventilation conditions.
Pain points before transformation
1. Directly use ordinary garden soil for planting. When watering, the soil will splash everywhere, and the stains on the balcony countertop will be difficult to clean;
2. The pot soil becomes hardened in a short period of time, root breathing is blocked, and some potted plants grow sluggishly;
3. Weeds are very easy to grow on the surface of the pot soil, and small black flying insects break out repeatedly;
4. The exposed pot soil looks messy and the balcony lacks a garden atmosphere.
Transformation goals
✅ Optimize the potting substrate formula to improve drainage and breathability and reduce the risk of root rot.
✅ Use cobblestone paving to solve the problem of mud splashing and inhibit the reproduction of weeds and flying insects.
✅ Create a neat and beautiful mini balcony garden at low cost
✅ Reduces the difficulty of post-maintenance and is suitable for gardening novices
List of plants to be planted: alum root, petunia, succulents, pothos, rosemary and herbs, all in pots, no ground planting arrangement.
Part One: Scientific matching plan for balcony potted plant substrates
Important note: Cobblestone paving is a surface protective decoration, and the core foundation is the matrix formula. If the ratio of the substrate is unreasonable, even if the paving effect is good-looking, the plants will still die easily. It is not recommended to directly use heavy clay garden soil excavated from the community to pot directly.
3 Balcony-Specific Potting Mix Formulas (by Volume)
1. General-Purpose Mix | For most foliage plants and flowering herbs (e.g., Pothos, Heuchera, Petunia, Rosemary): 40% Coconut Coir + 30% Peat Moss + 20% Perlite + 10% Composted Organic Fertilizer. Features: Balances nutrient and water retention with good aeration; suitable for most potted plants on enclosed balconies. Place a 2–3 cm layer of expanded clay pebbles at the bottom for drainage; ensure the pot has drainage holes.
2. Mix for Succulents & Drought-Tolerant Plants: 20% Coconut Coir + 40% Volcanic Rock + 25% Coarse River Sand + 15% Slow-Release Fertilizer. Features: Rapid drainage reduces the risk of root suffocation; ideal for succulents and cacti on balconies with abundant sunlight.
3. Mix for Moisture-Loving Foliage Plants (e.g., Ferns): 50% Leaf Mold + 30% Coconut Coir + 20% Perlite. ⚠️ Note: For these high-humidity plants, covering the soil surface with pebbles is not recommended, as it can trap moisture and lead to mold growth.
Key Tips: Mix the substrate thoroughly until uniform. After planting, leave a 1–2 cm gap between the soil surface and the rim of the pot to allow space for a decorative pebble top-dressing later.
Key Functions of Pebble Top-Dressing
1. Physical barrier: Prevents potting soil from splashing during watering, keeping balcony surfaces clean and protecting plant leaves from soil stains;
2. Reduces soil moisture evaporation, thereby lowering watering frequency in high-temperature environments;
3. Acts as a physical barrier against adult fungus gnats (small black flies) trying to lay eggs in the soil, reducing the risk of pest outbreaks;
4. Inhibits the germination of weed seeds on the soil surface;
5. Covers exposed soil for a uniform look, enhancing the refined aesthetic of your balcony garden.
Pebble Selection Guide
1. Particle size: Use 5–10mm pebbles for small pots and 10–15mm for medium-to-large pots; avoid overly large pebbles to maintain visual balance;
2. Material: Prioritize natural matte river pebbles; avoid dyed artificial pebbles, as sunlight causes fading and the leaching of harmful substances that can contaminate the soil and damage plant roots;
3. Color: Natural tones such as off-white, light gray, or light brown complement most green plants;
4. Preparation: Rinse thoroughly with clean water to remove stone dust before use.
Standard Application Steps
1. Complete the planting process and fill the pot with substrate, leaving a 1–2cm gap between the soil surface and the rim of the pot;
2. Leave a 5–8mm clear space around the plant stem/base; do not pack stones tightly against the stem, as this can cause rot due to poor air circulation;
3. Spread the pebbles evenly, strictly controlling the layer thickness to 1–1.5cm; avoid applying a layer that is too thick;
4. Gently shake the pot after application to level the pebbles and prevent uneven piling or mounding.
⚠️ Important Note: Pebble top-dressing does not improve drainage at the bottom of the pot; the pot must have drainage holes, and standing water at the bottom is strictly prohibited. Since the pebbles cover the soil surface, you must move the stones aside to touch the soil underneath and check its moisture level before watering; do not rely solely on the dryness of the surface pebbles, as this could lead to misjudgment and cause root rot from overwatering. Feedback on the Renovation Results
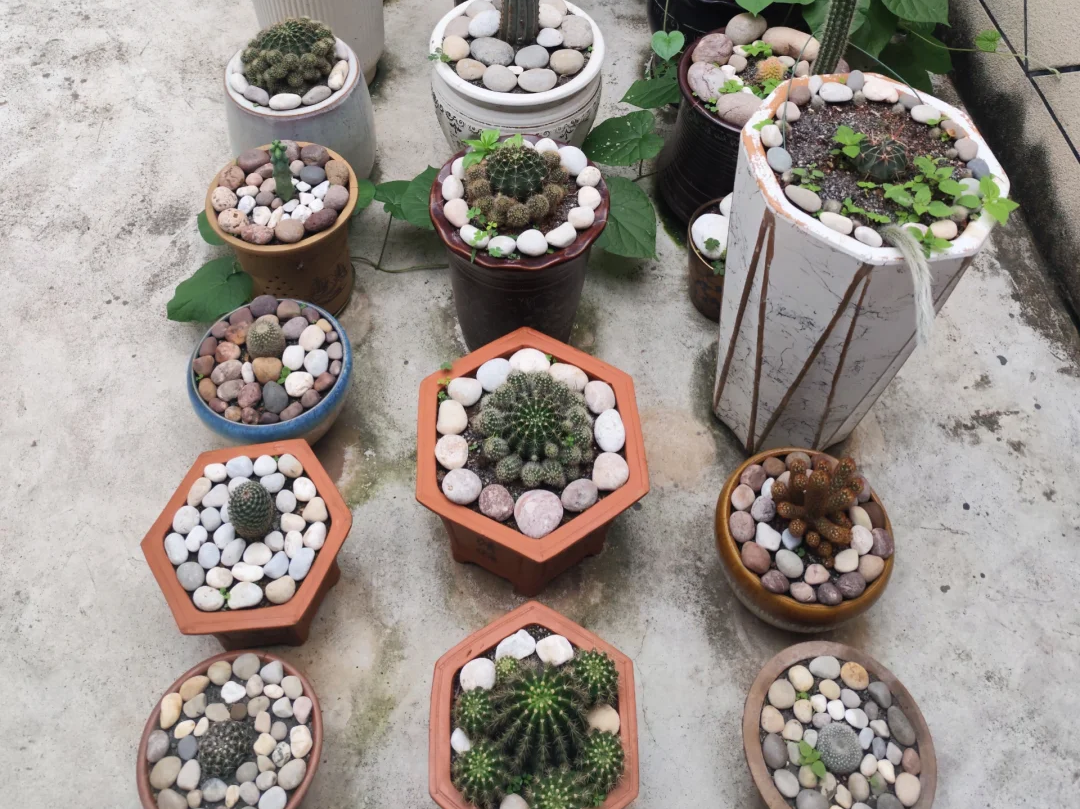
After completing the full renovation—using a specialized growing medium topped with a layer of river pebbles—and maintaining the setup for four months, the results are as follows:
1. Watering no longer causes soil splashing, significantly reducing the cleaning burden for the balcony surface;
2. Soil compaction is noticeably delayed, weed germination is minimal, and infestations of small black fungus gnats have virtually disappeared;
3. The uniform beige-grey natural river pebbles create a cohesive visual look for all the potted plants; the staggered arrangement of pots on the 3m² balcony evokes a natural garden atmosphere;
4. Plant growth is steady; petunias are blooming continuously, and succulents look plump and healthy.
Common Pitfalls to Avoid
❌ Layering the pebbles too thickly (over 2cm): This reduces soil breathability and keeps the interior constantly damp, making root rot highly likely; a thin layer of 1–1.5cm is sufficient.
❌ Wrapping pebbles tightly around plant stems: This causes stems to rot due to trapped humidity; a gap must be left around the base of the plant.
❌ Using dyed or colored pebbles: These fade in the sun, and harmful substances can leach into the soil, damaging the plants.
❌ Applying pebble top-dressing to high-humidity plants (like ferns): The enclosed, damp environment beneath the stones fosters mold growth.
❌ Using only nutrient-rich potting soil without adding gritty aggregates: Even with a pebble top-dressing, water can still pool and suffocate the roots.
❌ Judging moisture levels solely by the surface stones: You must push aside the stones to check the actual soil moisture before watering.
Tips for Extending Your Mini Balcony Garden
1. Try to use a unified color scheme for pots (e.g., off-white or terracotta) to create a more harmonious look alongside the pebble top-dressing;
2. Mix in a small amount of volcanic rock granules with the pebbles to add visual depth and texture;
3. For balconies exposed to intense direct sunlight, prioritize light-colored pebbles; they reflect some sunlight, helping to lower the surface temperature of the soil;
4. For enclosed balconies with poor ventilation, increase the proportion of perlite or volcanic rock granules in your soil mix to enhance the wet-dry cycle.
Conclusion
When creating a mini balcony garden, an attractive top-dressing is merely the finishing touch; a scientifically sound potting medium is the essential foundation. This combination of potting mix and pebble top-dressing is beginner-friendly, low-cost, and uses easily accessible materials. Whether for an enclosed balcony in a small apartment or an open-air one, this approach is easy to implement. By carefully planning both the soil mix and the surface covering, you can create a neat, refined mini-garden at home without the need for major renovations.
